Introduction
This guide aims to document a WireGuard configuration on Ubiquiti (Unifi and EdgeOS) hardware to send all traffic from a given WiFi network through a VPN. WireGuard itself has been much-hyped and documented elsewhere; the short story is that it’s a simple-to-configure VPN designed to use modern cryptography and fast. On a 100Mb connection, I’m getting speeds of around 85Mb through the VPN.
WireGuard is still poorly supported on Windows, however. There are third-party clients, but (as of writing) these have not been audited and the WireGuard authors caution against their use. It’s also meant for use as a point-to-point VPN, so each device would need its own key and client software.
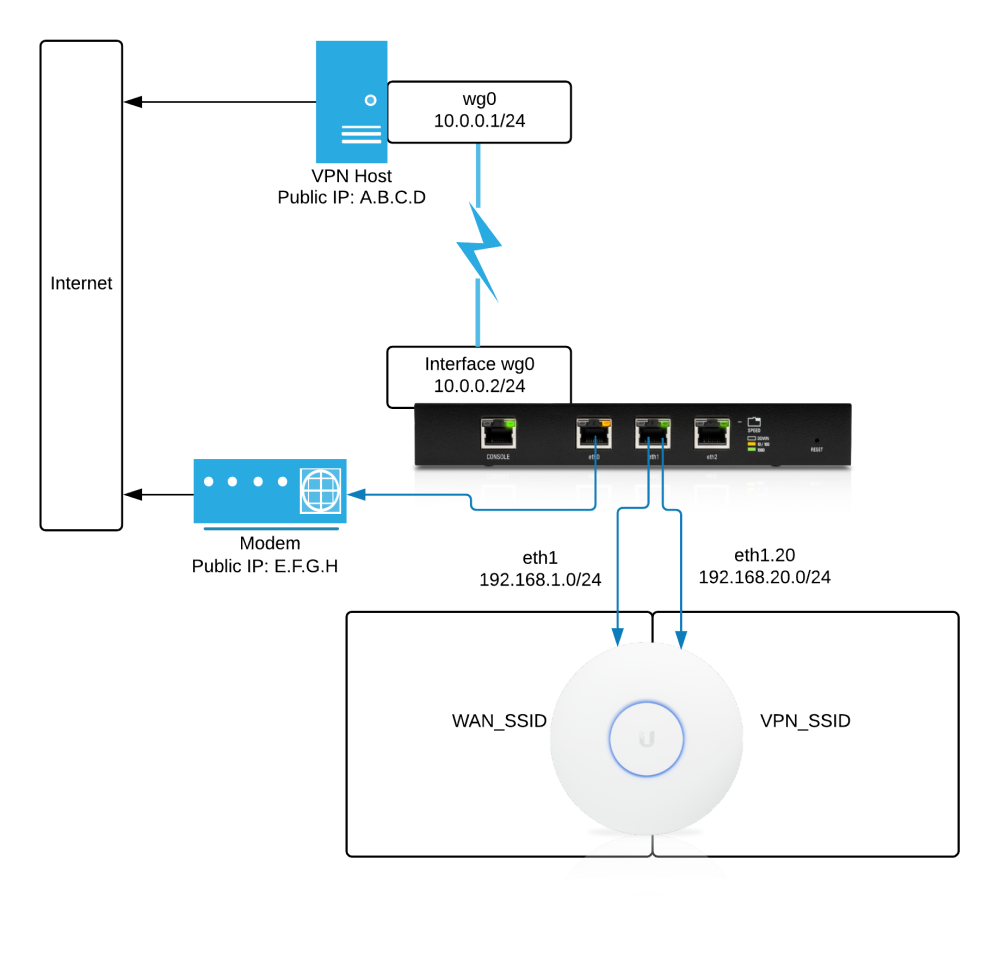
Configuring it at the router level means there’s only one client to set up, and then any device can easily connect and take advantage of the VPN. Based on the diagram above, any clients connected to VPN_SSID should route through the tunnel and come out of external IP A.B.C.D; any on WAN_SSID should go straight out through E.F.G.H.
There are various other guides for configuring WireGuard on EdgeRouters, and a very active thread on the Ubiquiti forums. Most writeups seem to be router-to-router or aimed at configuring the router as a VPN server to remotely access devices on the home network. There are a couple that describe sending traffic on a home network through a commercial VPN service (eg Mullvad) but so far I haven’t seen a comprehensive guide on how to roll your own VPN and selectively send certain hosts through it. The information’s probably all out there, but hopefully I can bring it all together.
This guide will document the following:
- WireGuard server setup on an Ubuntu 18.04 VPS;
- WireGuard client setup on a Ubiquiti EdgeRouter Lite;
- Network configuration on the Edgerouter and an Unifi UAP-AC-Lite, and
- Routing configuration on the Edgerouter and VPS.
I’m assuming at this point you already have a basic working Edgerouter configuration and that you’re able to access its CLI. You should also have a working UniFi controller. On the server side, these steps will specifically apply to Ubuntu/Debian as that’s what I’m familiar/comfortable with. The general process should be similar for any other distribution but I can’t speak to specific steps.
On to configuration!
Setting up the Tunnel
Server Setup
Installation
WireGuard isn’t packaged in the default Ubuntu repos, so add their PPA first:
sudo add-apt-repository ppa:wireguard/wireguard
Hit enter at the prompt, then install:
sudo aptitude install wireguard
Done.
Configuration
The package should have created an /etc/wireguard folder. The next steps will be easier as root, so su up:
$ sudo su -
# cd /etc/wireguard
# umask 077
# wg genkey | tee priv.key | wg pubkey > pub.key

# cat priv.key
yMap+ivTTq99VzpotSPZAjlsgVsA5   # This will be different on yours!

# touch wg0.conf   # This can be named wg0 or wg1 or anything; it'll determine what your interface is called.
# exit
This should have created two files, priv.key and pub.key. The private key should be readable only by root.
Edit wg0.conf and fill it as follows:
[Interface]
Address = 10.0.0.1/24
SaveConfig = true
ListenPort = 51820
PrivateKey = yMap+ivTTq99VzpotSPZAjlsgVsA5
Save and exit. There’s some more configuration needed to get both ends talking; we’ll come back to this after…
Router Setup
Installation
The Edgerouter filesystem is mostly wiped on firmware update, except for /config. We’ll put files here, and they’ll be maintained across updates.
Go to the vyatta-wireguard GitHub page, identify which version you need, and download the latest .deb to your router:
cd /config/user-data
curl -o wireguard.deb -L https://github.com/Lochnair/vyatta-wireguard/releases/download/<release>/wireguard-<platform>-<release>.deb
Install it using dpkg:
sudo dpkg -i wireguard.deb
Done.
Configuration
cd to /config/auth and generate a keypair for the router:
wg genkey | tee priv.key | wg pubkey > pub.key
Back to the server for a moment to grab its public key. On your VPS, run:
costa@calypte:/etc/wireguard$ sudo cat pub.key
3yJTE4ZWFbEjCHeJqlgYo5B1sigMfIe
Copy the output (3yJTE etc etc).
Now on the router, type configure to get into configuration mode. Do the following, adjusted as needed for your network. Substitute your public key from the server in the two peer lines.
set interfaces wireguard wg0 address 10.0.0.2/24
set interfaces wireguard wg0 listen-port 51820
set interfaces wireguard wg0 peer 3yJTE4ZWFbEjCHeJqlgYo5B1sigMfIe allowed-ips 0.0.0.0/0
set interfaces wireguard wg0 peer 3yJTE4ZWFbEjCHeJqlgYo5B1sigMfIe endpoint your.server.address:51820
set interfaces wireguard wg0 private-key /config/auth/priv.key
set interfaces wireguard wg0 route-allowed-ips false
commit
save
exit
This does the following:
- Creates a wg0 interface on the EdgeRouter with IP 10.0.0.2;
- Tells WireGuard to accept any packets coming over the tunnel (
allowed-ips 0.0.0.0/0); - Keeps your private key out of the configuration tree;
- Prevents Wireguard from adding a rule that would route everything (0.0.0.0/0) over the tunnel. We’ll deal with routing later.
Make the Connection
Back to the server to finish configuration. Edit the /etc/wireguard/wg0.conf you created earlier, to add a peer section for the router.
-
PublicKey is obtained from running
cat /config/auth/pub.keyon the router. -
AllowedIPs should be the local network you’re piping through the VPN, in this case 192.168.20.0/24.
- This is telling the server to accept any packet with a source address of 10.0.0.2, since we’ll be doing NAT at the router. This will also automatically add an entry in the server’s routing table.
-
WireGuard should automatically populate an Endpoint entry after you connect for the first time.
[Interface]
Address = 10.0.0.1/24
SaveConfig = true
ListenPort = 51820
PrivateKey = yMap+ivTTq99VzpotSPZAjlsgVsA5

[Peer]
PublicKey = <whatever you get from `cat /config/auth/pub.key` on the edgerouter>
AllowedIPs = 10.0.0.2/32
Now get WireGuard running as an automatic service, using the wg-quick systemd unit:
sudo systemctl enable [email protected]
sudo systemctl start [email protected]
If you haven’t already, open port 51820:
sudo iptables -A INPUT -p udp --dport 51820 -j ACCEPT
At this point there should be a working WireGuard connection between router and server. You can check with wg show:
$ sudo wg show
interface: wg0
  public key: 3yJTE4ZWFbEjCHeJqlgYo5B1sigMfIe
  private key: (hidden)
  listening port: 51820

peer: <should match public key from the router>
  endpoint: your.home.ip:51820
  allowed ips: 10.0.0.2/32
  latest handshake: 13 seconds ago
  transfer: 468 B received, 348 B sent
Note: The connection isn’t brought up until either side tries to use it, so endpoint/latest handshake/transfer may not show up immediately. Send some pings through to verify they’re talking:
$ ping 10.0.0.2
PING 10.0.0.2 (10.0.0.2) 56(84) bytes of data.
64 bytes from 10.0.0.2: icmp_seq=1 ttl=64 time=20.8 ms
64 bytes from 10.0.0.2: icmp_seq=2 ttl=64 time=19.7 ms
64 bytes from 10.0.0.2: icmp_seq=3 ttl=64 time=19.1 ms
Great.
Setting up the LAN
At this point we’ve got two VPN endpoints talking to each other, but traffic is still going straight out to the internet through the router. We need to do some configuration on the router to start directing clients over the VPN.
I’ve chosen to put all of my VPN clients on VLAN 20; any number will work but you need to stay consistent within your LAN. Let’s start tagging at the access point first, then deal with router interfaces later.
Access Point Configuration
Next, we need to add a new SSID (UniFi: “Wireless Network”) and tie it to a subnet (UniFi: “Network”). Connected clients will get an IP within the chosen subnet (in my case 192.168.20.0/24). Later, we’ll define rules on the router to send these over the VPN.
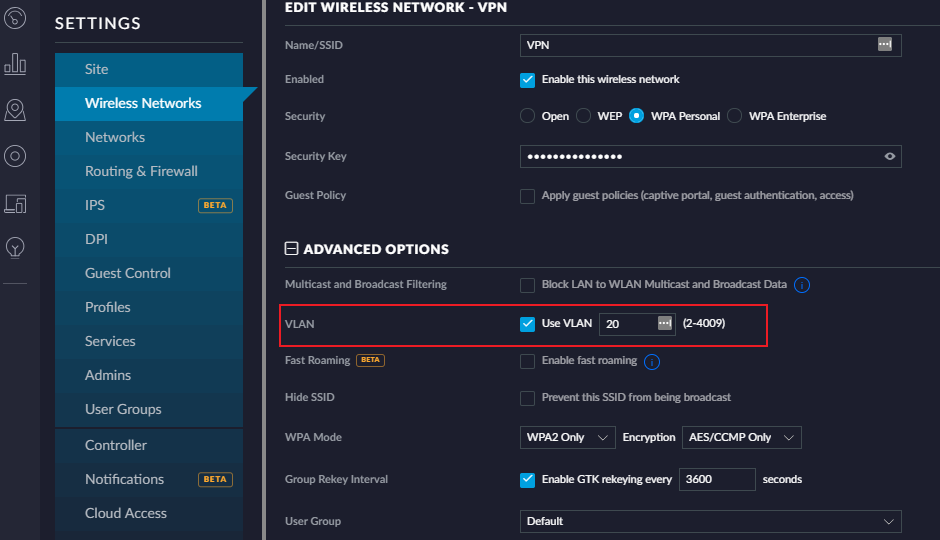
First, create a new WiFi network. I’ll call mine VPN; name yours whatever you want. Choose reasonable security settings and a good password. What’s important here is that under Advanced Options, you check “Use VLAN” and pick a VLAN. Again, any number (except 1) will work.
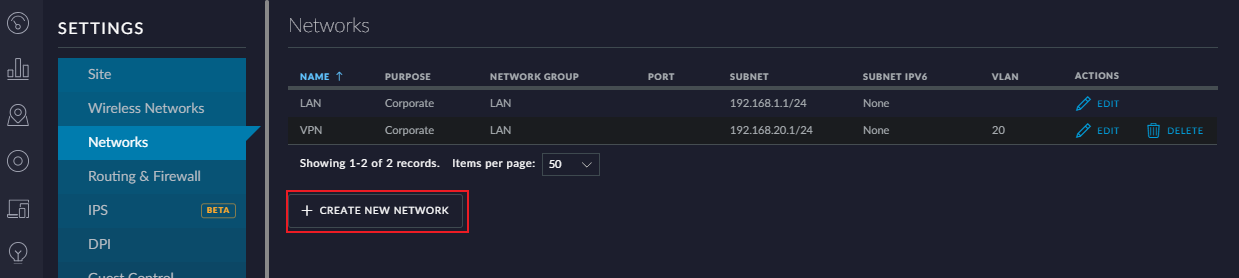
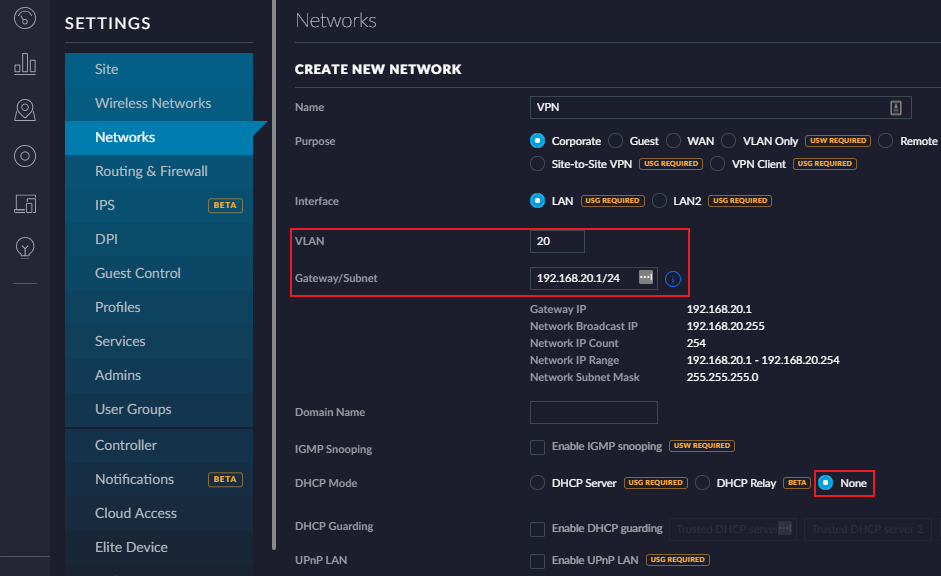
Next, add a corresponding Network. Most of the defaults are fine. Just make sure you use the same VLAN you just associated with the WiFi network. I’ve used 192.168.20.1 as my gateway, with a /24 subnet - this is up to you, but remember it in a few minutes when you’re setting up the router.
Router Configuration
There needs to be a matching VLAN on the router, so add the following to whichever port your access point is plugged into (mine’s on eth1). The address and subnet should match what you configured on the access point.
configure
set interfaces ethernet eth1 vif 20 address 192.168.20.1/24
set interfaces ethernet eth1 vif 20 description 'VLAN for VPN'
commit
save
At this point, any device with an IP in 192.168.20.x should be able to access the internet, but it won’t be traveling over the VPN just yet.
DHCP Configuration (optional)
I’ve chosen to use DHCP for local addressing as I’m not running anything critical and don’t care to assign IPs. My DHCP configuration for the VPN network is as follows:
set service dhcp-server shared-network-name VPN authoritative disable
set service dhcp-server shared-network-name VPN subnet 192.168.20.0/24 default-router 192.168.20.1
set service dhcp-server shared-network-name VPN subnet 192.168.20.0/24 dns-server 1.1.1.1
set service dhcp-server shared-network-name VPN subnet 192.168.20.0/24 dns-server 1.0.0.1
set service dhcp-server shared-network-name VPN subnet 192.168.20.0/24 lease 86400
set service dhcp-server shared-network-name VPN subnet 192.168.20.0/24 start 192.168.20.10 stop 192.168.20.100
commit
save
Setting up the route
Router Configuration
Create a routing table to deal with packets destined for the VPN. The table number can be anything; I’ve chosen 20 for consistency’s sake.
set protocols static table 20 description 'table for VPN'
set protocols static table 20 interface-route 0.0.0.0/0 next-hop-interface wg0
set protocols static table 20 route 0.0.0.0/0 blackhole distance 255
commit
This takes any packets caught by that firewall rule and, for any destination (0.0.0.0/0), sends them over wg0. The blackhole line prevents traffic from falling back to the default route (out through the cable modem) in case the tunnel is unavailable.
Next create a firewall rule to modify incoming packets with the table we just created. The source address should be the subnet you’ve already configured.
set firewall modify VPN_RULE description 'Modify rule for wireguard'
set firewall modify VPN_RULE rule 20 action modify
set firewall modify VPN_RULE rule 20 modify table 20
set firewall modify VPN_RULE rule 20 source address 192.168.20.0/24
commit
This will match any packets coming from devices on 192.168.20.0/24 and modify them per the rules in table 20.
Add the firewall rule to the virtual interface. After this, traffic on the VPN SSID should stop completely.
set interfaces ethernet eth1 vif 20 firewall in modify VPN_RULE
commit
Set up a NAT masquerade for the VPN:
set service nat rule 5020 description 'masquerade for VPN'
set service nat rule 5020 log disable
set service nat rule 5020 outbound-interface wg0
set service nat rule 5020 protocol all
set service nat rule 5020 type masquerade
commit
Finally, do the following. I ran into an issue where some (not all, and not always) pages would hang on “Establishing secure connection” and either load slowly or not at all. I suspect this is an issue with path MTU discovery. It hasn’t been a problem since applying this fix on the router:
set firewall options mss-clamp interface-type wg
set firewall options mss-clamp mss 1380
commit
save
Server Configuration
By default, IP forwarding isn’t enabled on the server. In /etc/sysctl.conf, uncomment the line #net.ipv4.ip_forward=1. This will be persistent.
Run sudo sysctl -p to apply the change.
Add the following rules to the firewall (“accept related/established” may already be there). Pay attention to the outbound interface, it’s likely either eth0 or ens3.
iptables -t nat -A POSTROUTING -s 10.0.0.2 -o ens3 -j MASQUERADE
iptables -A FORWARD -m conntrack --ctstate RELATED,ESTABLISHED -j ACCEPT
iptables -A FORWARD -i wg0 -o ens3 -m conntrack --ctstate NEW -j ACCEPT
If you’re using UFW these can go in /etc/ufw/before.rules where appropriate.
Test it out
At this point it’s probably not a bad idea to reboot your server and router. Once they’re both back up, everything should be working. Connect to the network you set up and check https://www.whatismyip.com/ to verify traffic is going through the tunnel.
That should be it. Enjoy!